Instrument software
Introduction
The instrument software is split into two main parts:
- The HAL , which directly manages the hardware and collects images.
- The UI , which coordinates data collection steps at a high level and allows use of the instrument as a manual microscope.
The HAL is written in C++ for performance and reliability and ease of integration with camera libraries, while the UI is written in Python with PySide (Qt) for ease of implementation. The two communicate over the network using a JSON API, making it possible to remotely manage a transformer.
This guide assumes general knowledge of Linux systems and the Raspberry Pi.
Setup
We will soon make a prebuilt Raspberry Pi image that can be flashed directly to a SD card and used immediately. Until then, or for development purposes, the steps below describe how to set one up from scratch.
Installation
Base operating system image
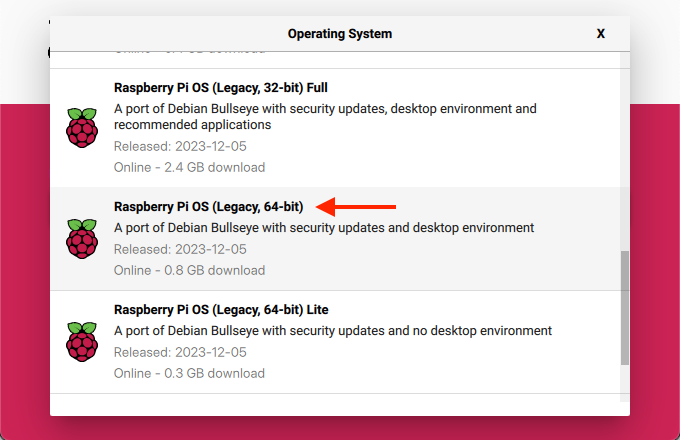
The HAL requires Raspbian Bullseye 64-bit (i.e. it has not been tested with Buster). This can be installed using the Raspberry Pi Imager as described on the Raspberry Pi website. As of this writing, this OS is a little buried: after opening the “Operating System” menu, open “Raspberry Pi OS (other)” and scroll down to “Raspberry Pi OS (Legacy, 64-bit)”.
We recommend setting up the Pi with only basic peripherals (mouse, keyboard, monitor, and optionally wired network) connected — do not plug in any 454 hardware yet.
Common dependencies
There are a number of packages that will need to be installed to be able to compile and run the UI and HAL. Turn on the Pi, connect it to a network, and in a terminal, run the following:
# Initial setup
sudo apt update
sudo apt upgrade

# Convenience packages
sudo apt install htop tmux mosh git build-essential rsync python3-pip

# Needed to build libcamera-apps
sudo apt install -y libepoxy-dev libjpeg-dev libtiff5-dev
sudo apt install -y qtbase5-dev libqt5core5a libqt5gui5 libqt5widgets5
sudo apt install -y libavcodec-dev libavdevice-dev libavformat-dev libswresample-dev
sudo apt install -y cmake libboost-program-options-dev libdrm-dev libexif-dev
sudo apt install -y libboost-dev
sudo apt install -y libgnutls28-dev openssl libtiff5-dev
sudo apt install -y qtbase5-dev libqt5core5a libqt5gui5 libqt5widgets5
sudo apt install -y meson
sudo apt install -y libglib2.0-dev libgstreamer-plugins-base1.0-dev
sudo apt install -y libpng-dev
sudo pip3 install jinja2
sudo pip3 install pyyaml ply
sudo pip3 install --upgrade meson

# Pi-specific packages for hardware access
# These *can* be installed on a regular aarch64 Debian Bullseye installation
# to compile there instead, but they will have to be manually copied from the Pi repo
sudo apt install libcamera-dev libcamera0 libpigpio1 libpigpio-dev raspberrypi-kernel

# Python packages for UI
sudo apt install python3-pyside2.* python3-pil python3-numpy python3-jsonschema
454 software
Now, it’s time to install the 454 software:
# Create required directories
mkdir -p ~/454/output/manual
sudo mkdir -p /454/hal

# Clone, compile, and install the HAL
git clone https://github.com/454bio/tirf-hal.git ~/454/hal-src
cd ~/454/hal-src
git submodule update --init --recursive
meson setup builddir
cd builddir
meson compile
rsync -avd ./ /454/hal/

# Clone the UI
git clone https://github.com/454bio/tirf-ui.git ~/454/ui
Configuration
To configure your specific hardware, first start by copying over the default configuration files:
sudo cp ~/454/hal-src/assets/config/*.{json,ini,yml} /454/
Then the next steps depend on the components in your setup.
Temperature sensor
Neither the HAL nor the UI strictly require a temperature sensor, but it is required for temperature control — a must-have for one pot sequencing.
The next few steps will require changes to the Raspberry Pi interface configuration.
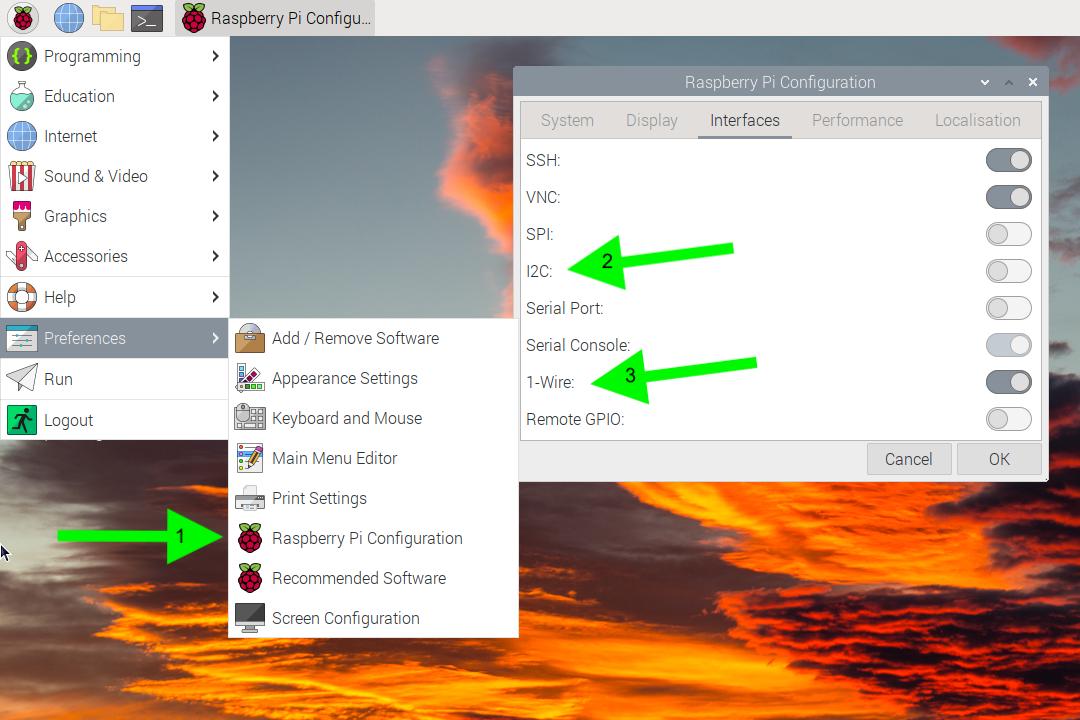
This can be found in: Raspberry Pi menu/Preferences/Raspberry Pi Configuration (1). Then choose the “Interfaces” tab.
Thermistor and ADC
First, you’ll need to enable I2C. In the “Interfaces” tab, turn on I2C (labeled 2 above), then press OK. You will be prompted to reboot your Pi.
Then, edit /454/hardware_configuration_transformer.json to include the following:
    "temperature_sensor_i2c_adc": {
        "i2c_bus": 1,
        "i2c_address": 72,
        "known_temperature_kelvin": 298.15,
        "beta_value": 3950,
        "resistance_at_known_temperature_ohms": 10000
    },
The i2c_ variables here are consistent with the circuit described in the Electronics section, and the thermistor parameters are consistent with the recommended thermistor. If you selected a different thermistor, the appropriate values can be obtained from the datasheet.
If you are using the thermistor, your config must not also contain the 1-wire section below.
1-wire
First, you’ll need to enable the 1-Wire interface. In the “Interfaces” tab, turn on 1-Wire (labeled 3 above), then press OK. You will be prompted to reboot your Pi.
Then, edit /454/hardware_configuration_transformer.json to include the following:
"temperature_sensor_w1_glob": "/sys/bus/w1/devices/28-*/temperature",
If you are using the the 1-wire sensor, your config must not also contain the thermistor section above.
Camera
Vision Components camera
First, set up your Pi according to the Vision Components documentation.
After rebooting, it may be useful to proceed with normal setup first just to validate that the camera is working. To integrate with our software, set up external trigger in their driver software by editing /boot/config_vc-mipi-driver-bcm2835.txt:
- Choose the
config_vc-mipi-driver-bcm2835-raspi4B.txtplatform - Choose the
dtoverlay=vc-mipi-bcm2835-raspi3Bplus-cam0-imx183overlay - Set the
dtparam=cam0_sensor_mode_5parameter - Leave the
dtparam=cam0_io_config=8parameter alone - Reboot
The VC camera has a quirk where it will use the external trigger to set the duration of the pulses only if the exposure time is 10 ms or less. At longer exposures, it will expose for the set duration and ignore the second pulse.
This is set in the HAL’s camera configuration at /454/vc_camera_config.json:
"exposure_time_us": 10000,
Pi HQ camera
Support for the Pi HQ camera is included out of the box with Raspbian. To enable external trigger, append imx477.trigger_mode=2 to your /boot/cmdline.txt.
On a typical transformer, a complete /boot/cmdline.txt contains the following:
console=serial0,115200 console=tty1 root=PARTUUID=6699147f-02 rootfstype=ext4 fsck.repair=yes rootwait quiet splash plymouth.ignore-serial-consoles imx477.trigger_mode=2
If you are using a standard color camera module (and not a debayered grayscale module), edit the HAL configuration at /454/libcamera_config.json to read:
"sensor_type": "imx477",
Filter wheel
The HAL configuration at /454/hardware_configuration_transformer.json has reasonable defaults for filter wheel position:
    "filter_controller": {
        "stepper": {
            "gpio_pins": [7, 8, 14, 15],
            "pwm_pin": 12,
            "pwm_standby": 400,
            "pwm_on": 1000,
            "step_time_us": 2400,
            "reset_step": -400
        },
        "positions": {
            "red": 80,
            "orange": 160,
            "green": 240,
            "blue": 320,
            "no_filter": 0
        }
    },
These may be adjusted if your filters are not properly aligned with the optics.
Focus calibration
The HAL configuration at /454/hardware_configuration_transformer.json has reasonable defaults for the focus position corresponding to each wavelength:
    "focus_controller": {
        "stepper": {
            "gpio_pins": [24, 25, 26, 27],
            "pwm_pin": 5,
            "pwm_standby": 150,
            "pwm_on": 1000,
            "step_time_us": 1200
        },
        "positions": {
            "red": 0,
            "orange": -850,
            "green": -1525,
            "blue": -1860
        }
    },
If images are out of focus between wavelengths, the positions may be adjusted:
- Edit the configuration such that all of the positions are at zero (i.e.
"red": 0, "orange": 0, ...). - Close the UI and restart the HAL (see below).
- Use the live preview to image each wavelength and focus using the manual focus adjustment buttons. Take note of the values reported in the status bar (“Filter at [color name] position ([step number])”).
- Put these values back in the configuration.
- Restart the HAL.
Finalizing your setup
- Connect all of the hardware.
- Install the HAL as a
systemdservice:- Copy assets/config/454-hal.service to
/etc/systemd/system/454-hal.service - Select the appropriate camera by replacing
/454/libcamera_config.jsonwith/454/vc_camera_config.jsonor/454/pylablib_config.jsonif appropriate. - Install and run the service:
sudo systemctl daemon-reload
sudo systemctl enable 454-hal
sudo systemctl start 454-hal
- Copy assets/config/454-hal.service to
- Add a desktop shortcut to the UI by copying 454-sequencing.desktop to
~/Desktop/454-sequencing.desktop
Usage
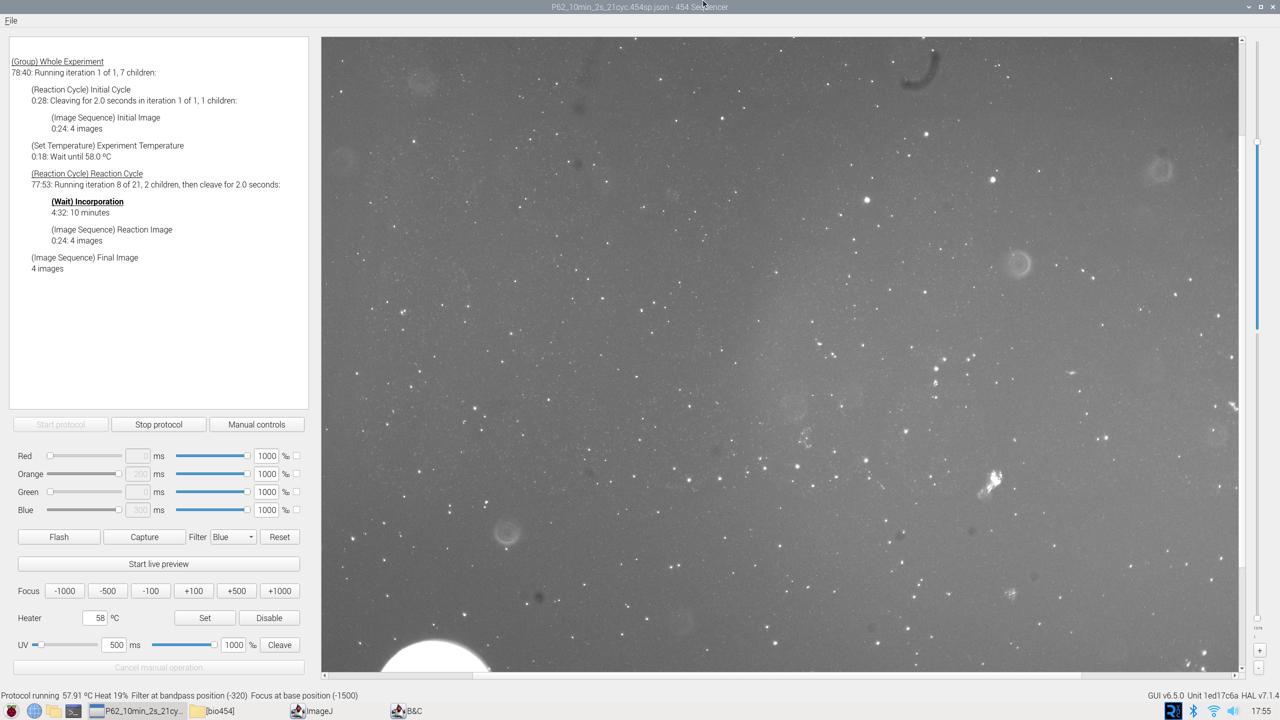
Manual image capture
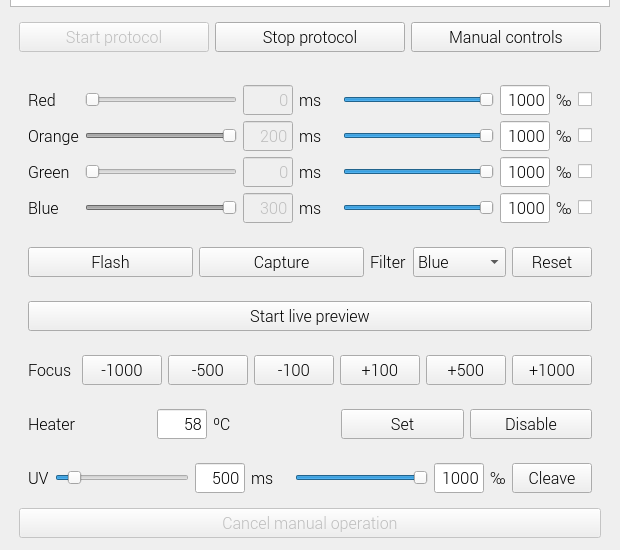
The manual controls allow realtime control of the sequencer hardware. To use the manual controls, open the UI and click the “Manual controls” button.
The top half configures visible light TIRF. After enabling any number of LEDs using the checkbox on the right, an exposure time in ms and intensity in ‰ (parts per 1000) can be set. These TIRF settings will be used when any of the following buttons are pushed:
- “Flash”, which flashes the LEDs without capturing an image
- “Capture”, which captures one image, saves it in
~/454/output/manual, and displays it in the preview - “Start live preview”, which continuously captures images and displays them in the preview.
The HAL automatically exposes the sensor just long enough for the configured TIRF.
If the filter is anything other than “Any filter”, the filter wheel will be moved to the set position before an image is captured.
The focus buttons nudge the base focus — the focus for all other colors will be adjusted by the same amount.
The “Heater” section will only be present if a temperature sensor is configured. The “Set” and “Disable” buttons respectively set the specified temperature or disable the heater entirely.
The “UV” section allows manual cleaving with the “Cleave”, and the time and intensity behave exactly like the visible light controls.
Automated data collection
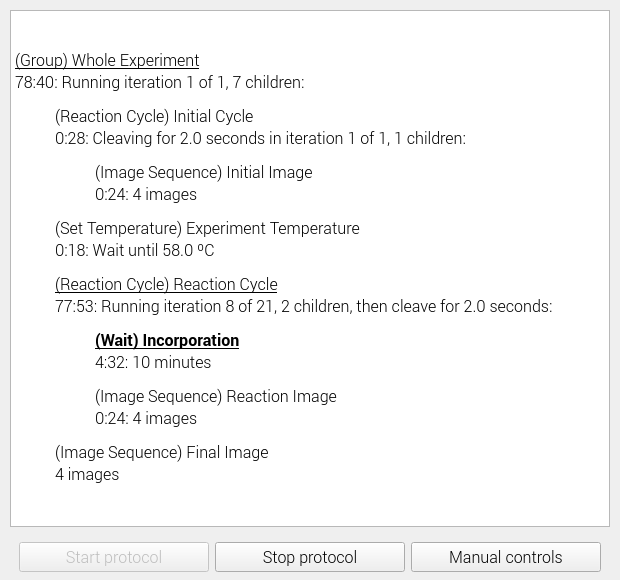
To collect data for sequencing automatically, open one of the preset sequencing protocols from the “File –> Open” dialog and then start it by pressing “Start protocol”. It will run until completion unless stopped with the “Stop protocol” button or a hardware error is detected.
If you would like to write your own automated sequencing protocol, you will have to do so manually as we have not yet implemented a protocol editor. Sequencing protocols are written in JSON, and can be validated with their JSON Schema specification .
Legacy code
The HAL used to be a fork of rpicam-apps (back when it was called libcamera-apps). This version of the code, along with all of its history, is available here .
A previous version of the instrument software was written in pure Python with GTK. While it only supports basic TIRF with the Pi camera (i.e. it lacks support for direct exposure control, the filter wheel, focus control, and live preview), it is available here for historical purposes only.